

Where Is Content Aware In Photoshop Cs2

Photoshop CS5 New Features – Content Aware Fill Tutorial
Version note: This tutorial on using Content-Aware Fill is for Photoshop CS5 and CS6. Photoshop CC users will want to bank check out the updated and improved Content-Aware Fill up in Photoshop CC 2019.
In a previous tutorial, we looked at Photoshop CS5'south upgraded Spot Healing Brush with its brand new Content-Aware Healing selection that lets Photoshop examine the actual contents of your image every bit information technology tries to figure out the best mode to remove or repair the damaged or unwanted area you've clicked on.
This fourth dimension, we look at some other new feature in Photoshop CS5 - Content-Enlightened Fill. It'south no coincidence that both of these new features share like names, since they do pretty much the aforementioned thing. The master deviation is in how we apply them.
Both features let Photoshop clarify the contents of the epitome to figure out what the photo would accept looked similar if the unwanted object or area had never been there. But even with its new Content-Aware abilities, the Spot Healing Brush is all the same best suited for smaller areas that we tin hands click on or paint over. Content-Aware Fill, on the other hand, lets us repair or replace larger, more complex areas, and even multiple areas at once, simply by drawing selections effectually them and letting Photoshop do the residual!
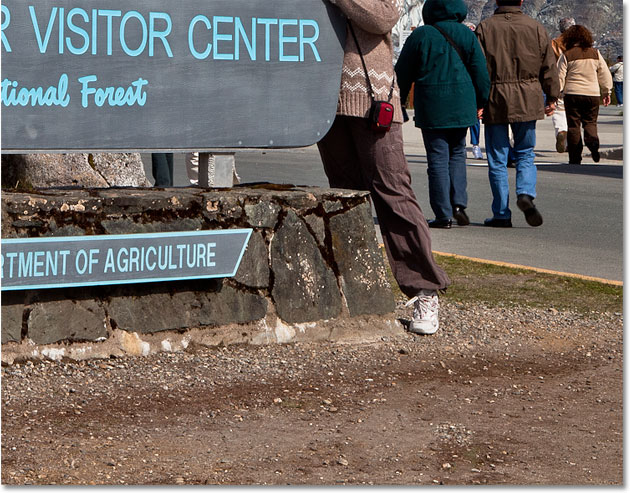
Here's a photo that suffers from a couple of distracting elements, especially the big wooden mail service blocking the view of the mountains above the Visitor Center sign:
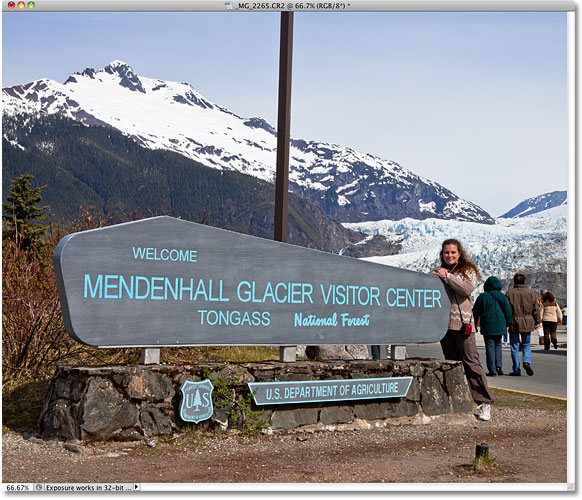
A squeamish view of the mount. Likewise bad that mail is in the manner.
The traditional fashion to remove the post would be with the Clone Postage stamp Tool, but let's meet if the new Content-Aware Fill up option in Photoshop CS5 tin can brand the job easier for usa. Every bit always, I'll get-go press Ctrl+J (Win) / Control+J (Mac) on my keyboard to create a copy of my image so I'thousand non making any changes to the original. If we expect in the Layers panel, we see that I now accept two layers, each containing the same image. The original photo volition remain safety on the Background layer, and all of the editing work I'm well-nigh to do will be done to the re-create of the image on Layer 1 higher up it:
Working on a copy of the image to protect the original.
Since "Layer ane" isn't very descriptive, I'll double-click directly on the layer'south name in the Layers panel and modify information technology to "content-aware fill", pressing Enter (Win) / Render (Mac) when I'thou done to accept the proper noun modify:
Renaming the layer to keep things organized.
To use Content-Enlightened Fill, nosotros first need to depict a pick effectually the object or area we want to remove or replace. Since the post is a elementary, direct-sided shape, I'll apply the Polygonal Lasso Tool, which is hiding behind the standard Lasso Tool in the Tools panel. To access it, I'll click and hold on the Lasso Tool until the fly-out menu appears, then I'll select the Polygonal Lasso Tool from the list:
The Polygonal Lasso Tool is still hiding backside the standard Lasso Tool in Photoshop CS5.
With the Polygonal Lasso Tool selected, I'll press the letter F on my keyboard to switch out of the document window and into full screen way, which will brand it easier to select the top of the post. And so I'll just click my fashion around the post to select information technology. You'll want to stay close to the edges of the object you're selecting for Content-Aware Fill to work best, but in that location'due south no need to be surgically precise:
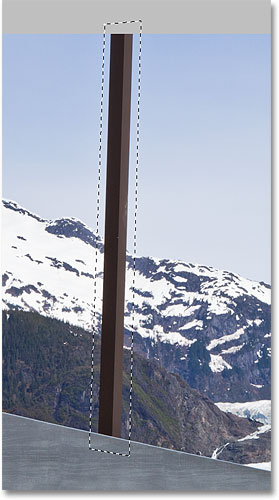
A choice outline at present appears effectually the post.
With the option in place, I'll go up to the Edit menu at the height of the screen and choose the Fill control:
Choosing the Fill command from the Edit menu.
Merely as Content-Aware Healing is a new option for the Spot Healing Brush in Photoshop CS5, Content-Aware Fill is a new option in the Fill up dialog box. Nosotros select information technology past choosing Content-Aware in the Contents section at the peak:
Photoshop CS5 now gives us a Content-Enlightened pick in the Fill dialog box.
In Photoshop CS4 or earlier, all nosotros could fill a selection with was a solid color or pattern, but with Content-Aware selected in CS5, Photoshop can at present examine the contents of the paradigm and try to fill up in the selected area with actual epitome detail, as if the object nosotros're removing never existed! At to the lowest degree, that'due south the idea of it. Permit'due south run into what happens when I click OK to go out out of the Fill dialog box:

Content-Aware Fill up was able to easily remove the mail service from the photo.
Just like that, the post is gone! Photoshop CS5 did an outstanding job of removing it and filling the surface area with image detail as if the post had never been in that location, and all I had to do was draw a option effectually it and choose Content-Enlightened from the Fill dialog box. Is it 100% perfect? Not quite. The acme of the mountain looks a little strange, and a couple of areas look similar a repeating design, just what we're left with now is cipher more than a quick clean up with the standard Healing Brush or the Clone Stamp Tool rather than having to put in a lot more than time and attempt by doing it all ourselves.
In that location's another distracting object of some sort in the lesser right corner of the photo that I'd like to remove, so I'll use the standard Lasso Tool this time to draw a quick selection around information technology:
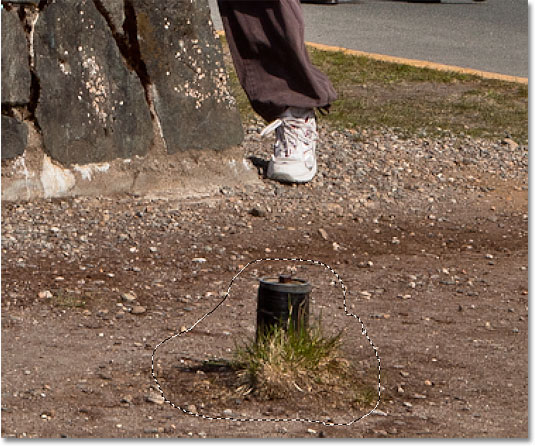
Drawing a pick around the object with the Lasso Tool.
With the object selected, I'll go back upwards to the Edit card and in one case once more cull the Fill command. When the Make full dialog box appears, I'll again choose the new Content-Aware pick. Finally, I'll click OK to exit out of the dialog box, and Photoshop CS5 does another groovy task at removing the object from the photo, filling the area with new image data:
Some other distracting object removed with almost no effort.
If you don't similar the results after running Content-Aware Fill, simply undo information technology by pressing Ctrl+Z (Win) / Command+Z (Mac), then running it again. You'll get a dissimilar result each time.
Back in a previous tutorial, we looked at how to stitch multiple photos together to create a panoramic paradigm using the Photomerge command in Photoshop CS4. We won't get into details here on how to create panoramic images since we covered it in the other tutorial, but if you've used Photomerge before, y'all'll be familiar with the trouble seen in the epitome below.
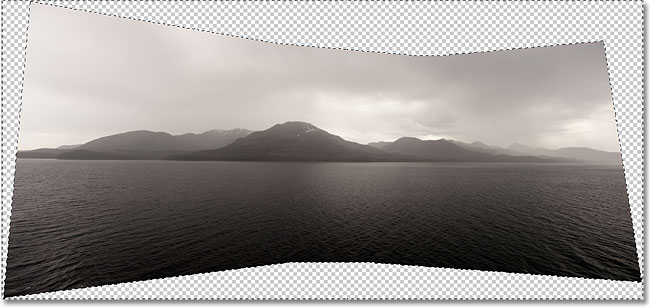
This is the panorama I created in the tutorial every bit it appeared right subsequently running the Photomerge command, which left me with lots of empty bare space around the paradigm:
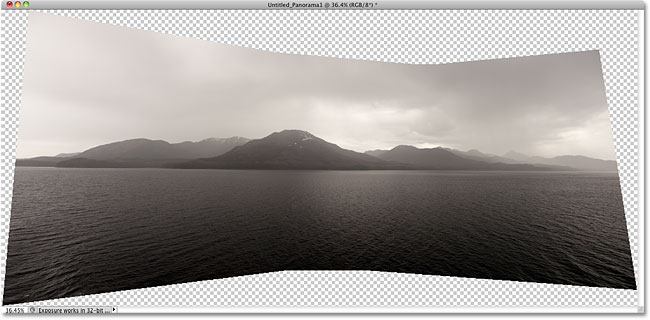
Photomerge is great at stitching images together, merely it leaves lots of blank space effectually the result.
Normally (equally in prior to Photoshop CS5), we'd become rid of all that blank space past simply cropping it away with the Crop Tool, but let's see what happens when we let Photoshop endeavour to replace the bare areas with actual image particular using Content-Aware Fill up.
I've gone ahead and merged all of the layers onto a unmarried layer, and I'll quickly select the image past holding downwards my Ctrl (Win) / Command (Mac) fundamental and clicking directly on the preview thumbnail in the Layers console:
Holding Ctrl (Win) / Command (Mac) and clicking on the preview thumbnail.
Every bit soon every bit I click on the thumbnail, a selection outline appears around the image:
The prototype is now selected. The blank areas are not.
At the moment, the image is selected, but I don't want to fill the image with anything. I desire to fill the bare space around it, so I demand to capsize my choice, which will select the blank areas and deselect the image. To do that, I could get up to the Select menu at the top of the screen and cull Inverse, but I'll use the faster keyboard shortcut Shift+Ctrl+I (Win) / Shift+Command+I (Mac):
The blank areas are now selected. The image is not.
With the blank area at present selected, I'll get up to the Edit card and choose Fill, but every bit I did before, and I'll select the new Content-Aware option at the top:
Selecting Content-Enlightened in the Fill dialog box.
I'll click OK to exit out of the dialog box, and after waiting a few moments for Photoshop to analyze the epitome, we get the results. I'll press Ctrl+D (Win) / Control+D (Mac) to remove the selection outline and then we can see the image meliorate:
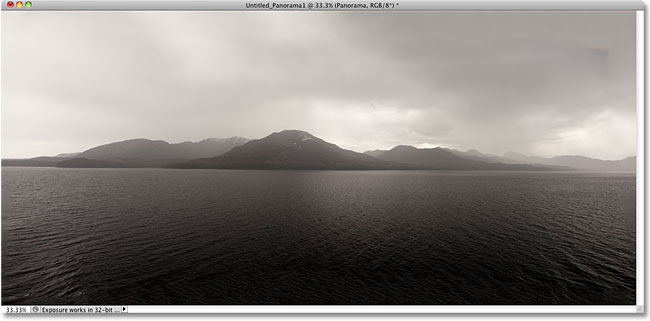
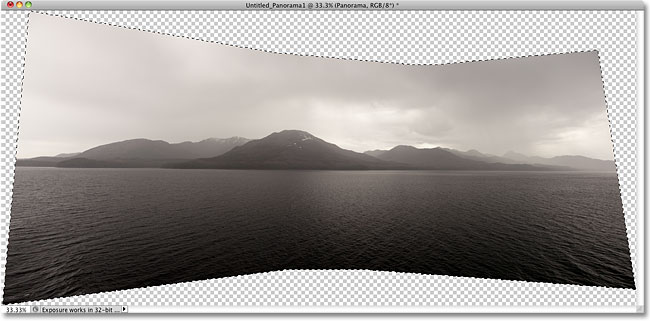
Content-Enlightened Fill up was able to extend the epitome into the bare area.
Does Photoshop CS5 have some serious wow gene going on? I would say so. Again, the results aren't perfect. In that location'south an obvious nighttime blotch in the clouds in the top right corner of the image and some of the water forth the far left and correct edges appears blurry, but Content-Enlightened Fill up was able to do eighty-90% of the piece of work for me in a matter of seconds, leaving me with nothing more than a quick clean up with one of the other retouching tools. I'd call that impressive!
And there we take it! That's our look at the new Content-Aware Fill up characteristic in Photoshop CS5! Cheque out our Photograph Retouching section for more Photoshop image editing tutorials!
Other Stuff
© 2022 Photoshop Essentials.com.
For inspiration, not duplication.
Site design by Steve Patterson.
Photoshop is a trademark of Adobe Systems Inc.
Source: https://www.photoshopessentials.com/photo-editing/content-aware-fill-cs5/
Posted by: bakermorefelied.blogspot.com
0 Response to "Where Is Content Aware In Photoshop Cs2"
Post a Comment